Diamine Inkvent 2022
21 January 2023 • Pens & InkThe Diamine Inkvent advent calendars are something I never imagined existed—24 small 12ml bottles of unique ink, and one 30ml bottle on Christmas Day. 2022 was the second year they produced one, and although I didn’t buy one for advent itself, I did pick one up at half price a couple of days after Christmas from Cult Pens.
The little 12ml bottles are adorably cute, and all the inks are somewhat Christmas- or winter-themed in name. I opened the calendar all in one go, and spent half an hour one afternoon swatching every ink. I can recommend a dip pen if you’re going to do this—I used a Lamy Safari, dipping the nib into each bottle in turn, but thanks to the feed it was a bit more of a pain to clean between inks than a proper dip pen would have been.
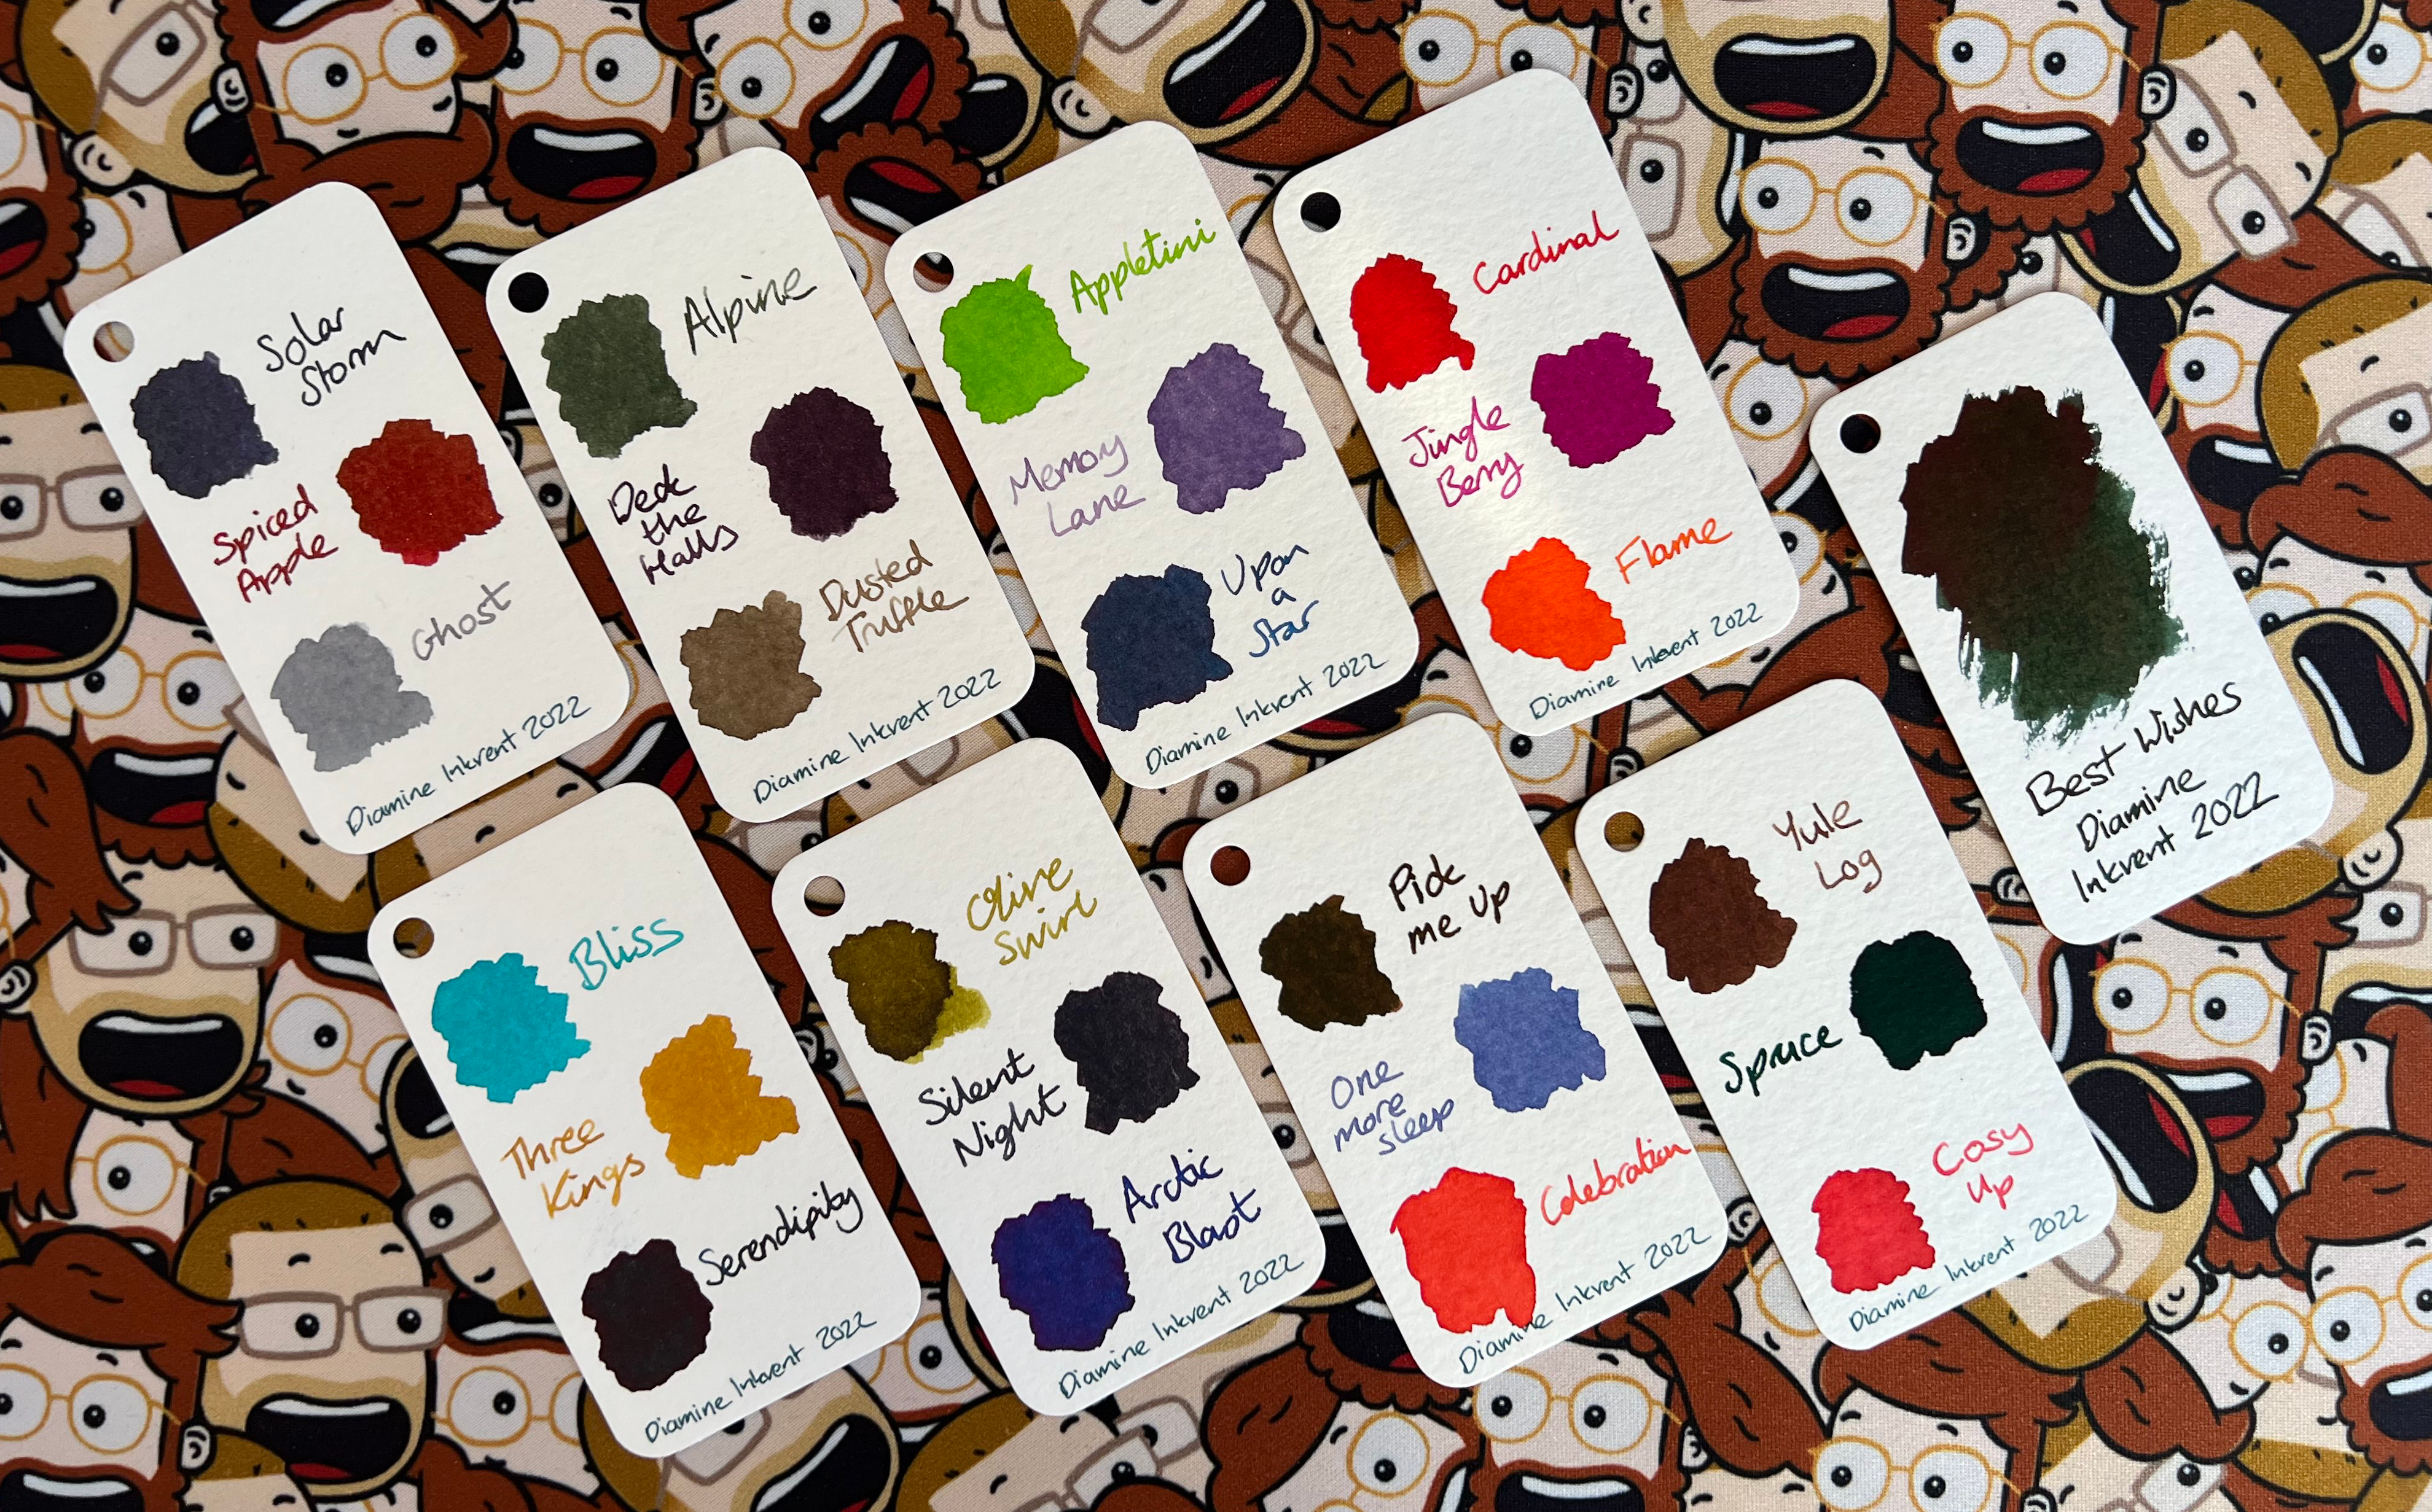
I swabbed three to a swatch for my homemade col-o-ring, and gave the large 30ml bottle its own. These are cards I’ve cut from 350gsm watercolour postcards, rounded the corners using a corner punch, and punched a hole in to thread them through a keyring. The result is a fantastic way to flick through my available inks and make a choice, and I love having it as something to play with sitting on my desk:
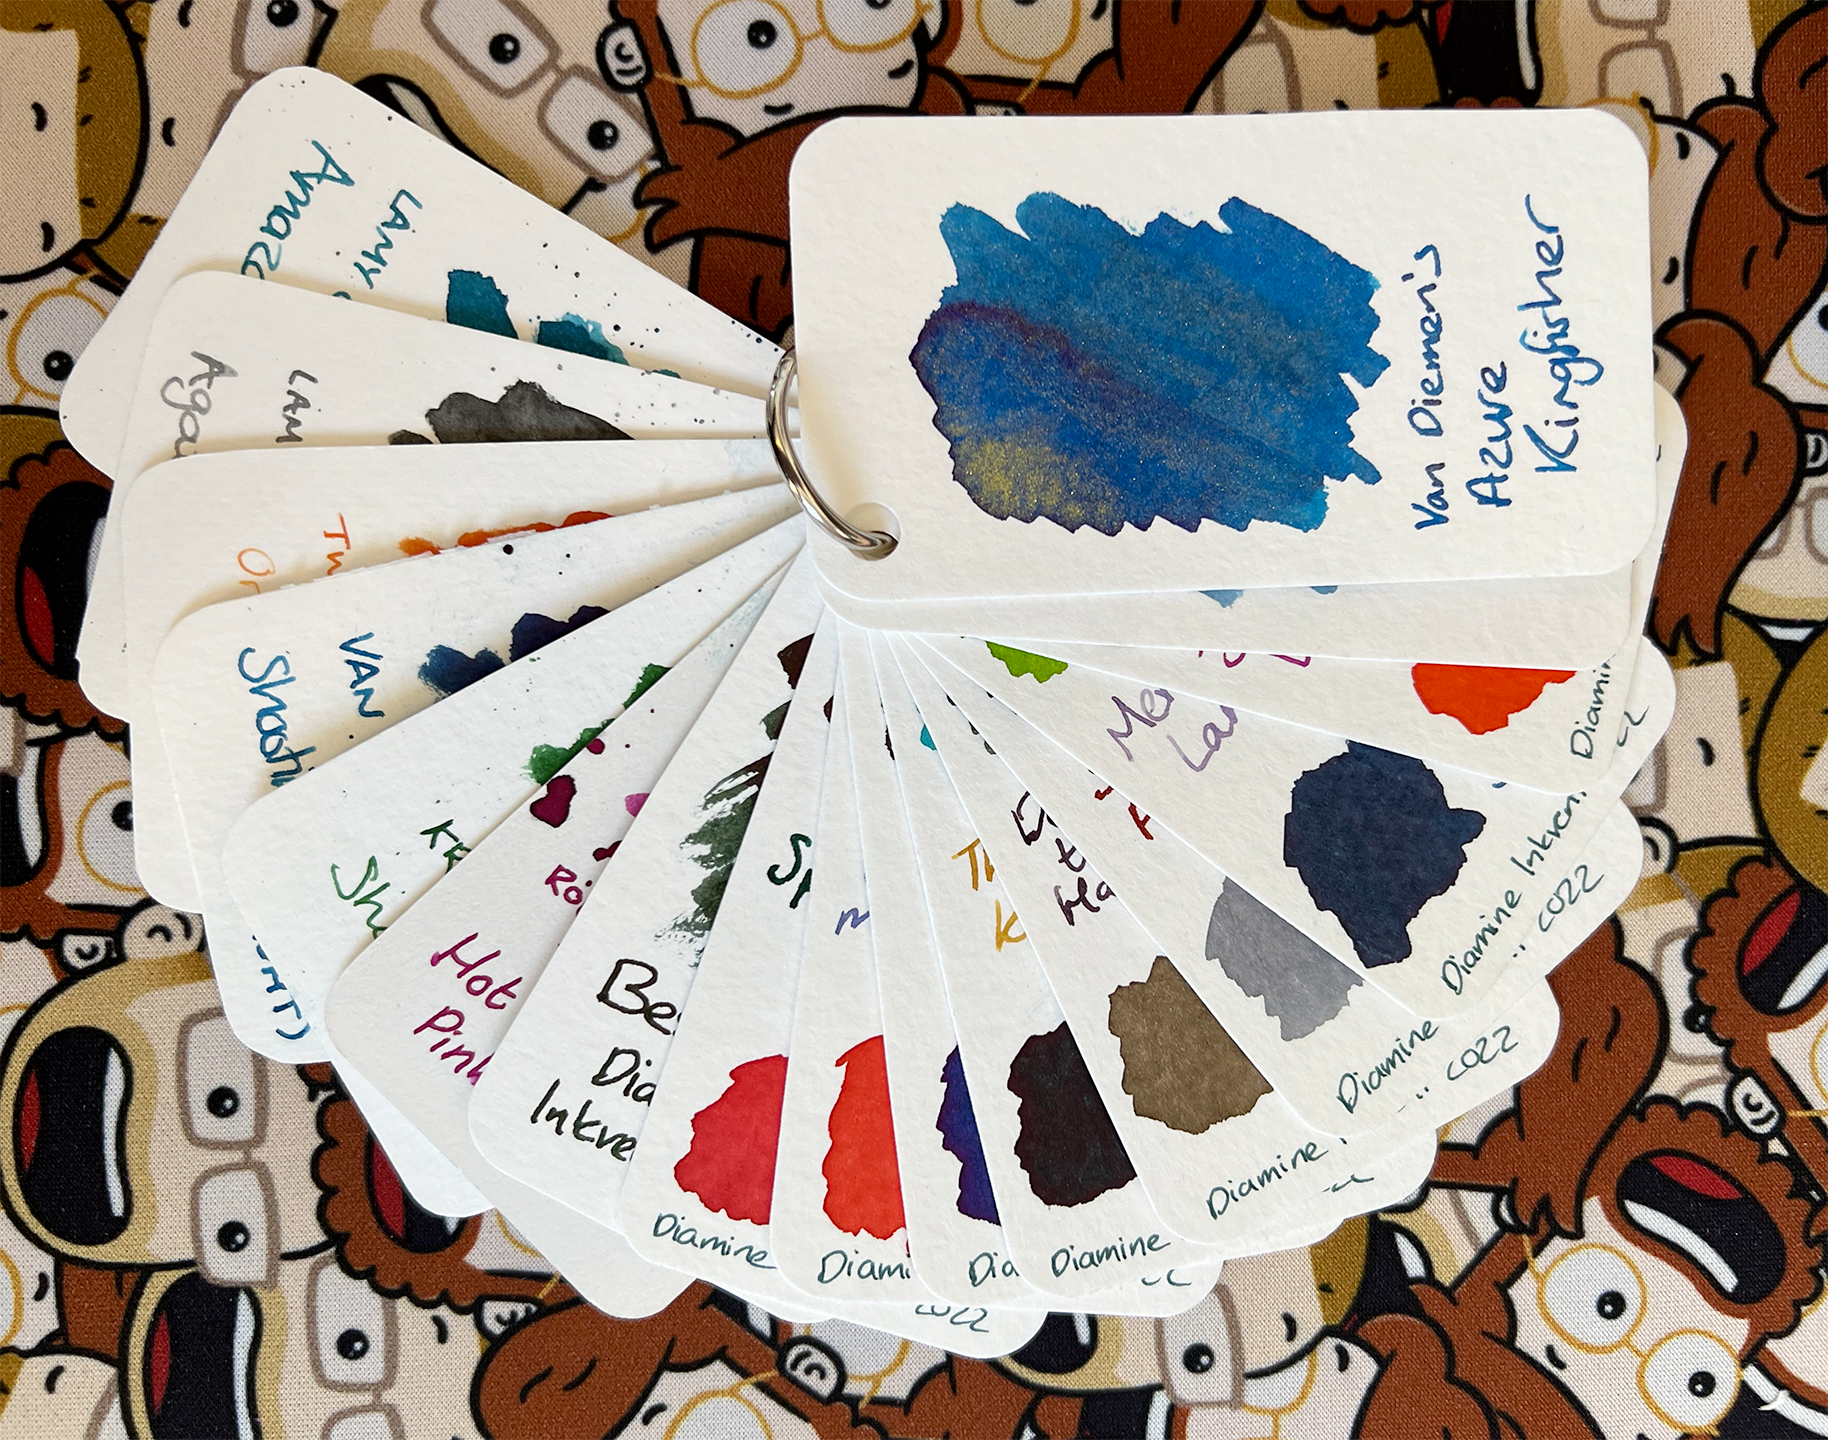
Speaking of which, how beautiful is that Van Diemen’s Azure Kingfisher from the Wilderness Series? It has such a beautiful golden shimmer and a slight red sheen. It was a birthday gift from a couple of wonderful friends, along with a custom pen from Just Turnings that matches it perfectly, and shows off its properties fantastically with a broad nib.
I’m not sure I’m likely to buy the advent calendar full price next Christmas—it is a fair amount of money, and I have many inks I still haven’t used yet from it—but I think they’re a fantastic idea from Diamine. Judging by last year, they’ll be selling each of the colours individually later in the year in larger bottles, so if there’s any that really take my fancy I don’t need to worry about 12ml not going particularly far.
So far, my favourite is Flame, but I am particularly partial to a good orange. What’s yours?
Swift Charts & Calendar Weekdays
20 January 2023 • Development • SwiftI’ve recently been working on adding a statistics section to Pendulum, the pen pal tracking app I develop with my friend Alex. This seemed like the perfect opportunity to use Swift Charts, Apple’s new charting framework.
I ultimately wanted to end up with a graph like the following:
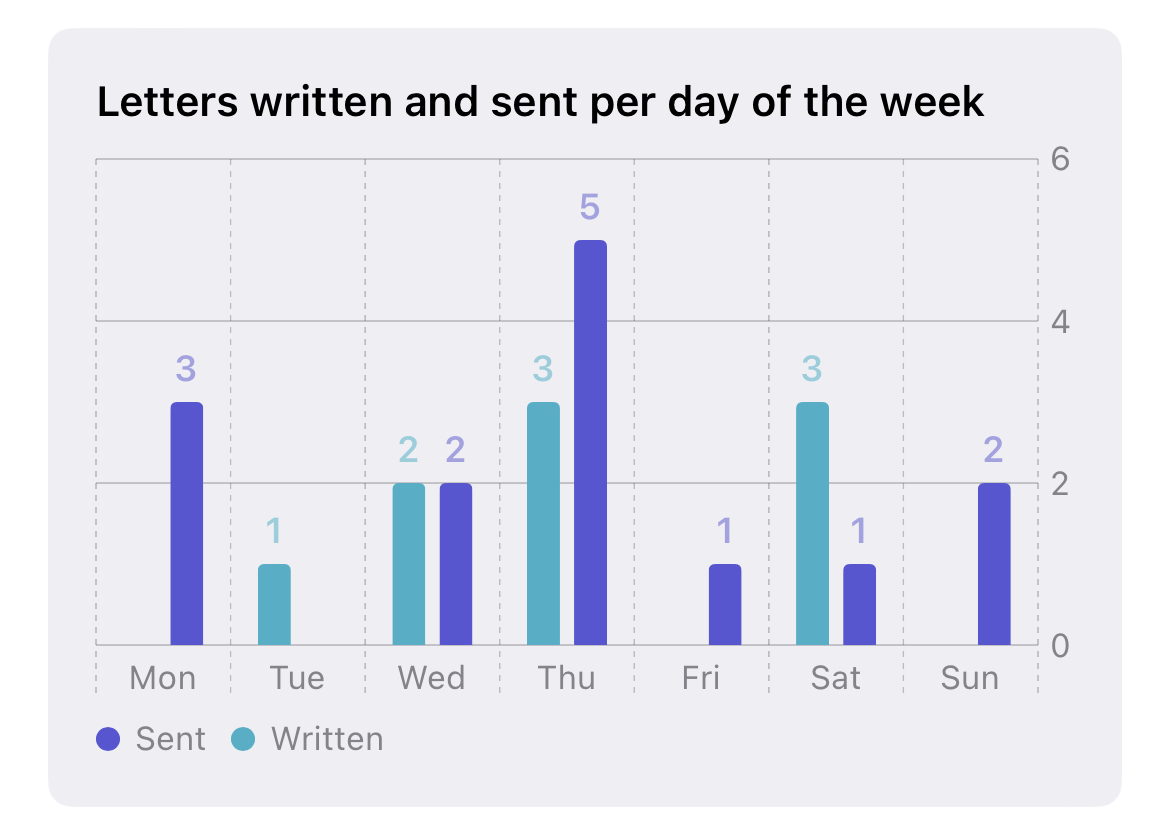
Swift Charts can perfectly handle multiple datasets on one graph, but the problem I ran into was that it doesn’t seem to have a way to natively aggregate data per day of the week. If I only had seven days worth of data, it would be fine—I could display just the day name on the axis, and no days would be repeated because I wouldn’t be displaying more than a week of data. However, as I want to aggregate every event, this wasn’t going to work. I decided to do the grouping of the data myself, and just pass Swift Charts a pre-binned dataset for it to present, where it wouldn’t have to worry about dates at all.
I had one other problem I wanted to solve: I wanted the graph to start on whatever the current locale thinks the start of the week is1. For us in the UK and Europe, we generally consider Monday the beginning of the week, as reflected in the graph above. But for the US, it should probably start with Sunday.
In order to generate the seven “bins” for the chart to show, I could use the handy Calendar.current.shortWeekdaySymbols property, which produces an array of the shortened names of the week, properly localised to the user’s current locale. However, regardless of locale, this array always starts with Sunday and ends with Saturday. There’s another property of the calendar, .firstWeekday, that returns a number between 1 (for Sunday) and 7 (for Saturday) representing what the locale considers to be the first day of the week. Using this, I can shift the array from shortWeekdaySymbols to produce the output in the right order. I decided to wrap both these pieces of information up in an enum to represent each day of the week:
enum Weekday: Int, CaseIterable {
    case sun = 1
    case mon = 2
    case tue = 3
    case wed = 4
    case thu = 5
    case fri = 6
    case sat = 7

    var shortName: String {
        return Calendar.current.shortWeekdaySymbols[self.rawValue - 1]
    }

    static var orderedCases: [Weekday] {
        Self.allCases.shiftRight(by: Calendar.current.firstWeekday - 1)
    }
}
You’ll also notice I’m using an extension to Array that allows me to shift an array, wrapping the values around to the end as they get popped off the front:
extension Array {
    func shiftRight(by: Int = 1) -> [Element] {
        guard count > 0 else { return self }
        var amount = by
        assert(-count...count ~= amount, "Shift amount out of bounds")
        if amount < 0 { amount += count }
        return Array(self[amount ..< count] + self[0 ..< amount])
    }
}
Now that I have an enum I can use to represent the days of the week correctly, and order them as defined by the user’s locale, I needed to use this somehow to generate data to pass to the chart. I started off by defining a struct to hold a single datapoint:
struct StatusCountByDay: Identifiable {
    let status: EventType
    let day: Weekday
    let count: Int
    var id: String { "\(day)-\(status.rawValue)" }
}
Here, EventType is an internal enum used by Pendulum to mark whether the event was a letter being sent, written, received, etc. What makes each data point unique in the chart is the combination of the day of the week, and the event type, so I combine those two together as the id for the struct.
Next, I needed to fetch the data and group it into buckets:
var days: [Weekday: [Event]] = [:]

for event in Event.fetch(withStatus: [.written, .sent]) {
    if !days.keys.contains(event.wrappedDate.weekday) {
        days[event.wrappedDate.weekday] = []
     }
     days[event.wrappedDate.weekday]?.append(event)
}
I start by defining a dictionary mapping weekdays to an array of events, and then looping over the events I’m interested in and adding them to the corresponding weekday key in the dictionary. This necessitated another extension to a Foundation object, this time on Date2:
extension Date {
    var dayNumberOfWeek: Int? {
        return Calendar.current.dateComponents([.weekday], from: self).weekday
    }
    var weekday: Weekday {
        return Weekday(rawValue: dayNumberOfWeek ?? 0) ?? .sun
    }
}
This uses the .weekday date component from the user’s current calendar, which returns the same 1–7 index as used by .firstWeekday, and returns the corresponding Weekday object.
With the data correctly bucketed, it was time to sum up the series and create the datapoints for the chart. When the data provided is not sequential (such as a series of dates) but is instead discrete (such as list of names, for example) Swift Charts will draw the bars in the order in which it first encounters them. You may think that weekdays are sequential—and you’d be right—but in this case, they’re not an object that Swift Charts understands in that way. So to draw the chart as intended, we need to create a StatusCountByDay instance for each weekday in the order we want. We also need to include one even when the count for that day is zero, because we don’t want the chart to just skip a day. I do this by looping over the weekdays ordered according to the locale, inside that looping over each event type, and calculating the sum for each:
var results: [StatusCountByDay] = []
for eventType in [EventType.written, EventType.sent] {
    for day in Weekday.orderedCases {
        let count = (days[day] ?? []).filter { $0.type == eventType }.count
        results.append(StatusCountByDay(status: eventType, day: day, count: count))
    }
}
Ultimately, we end up with a series of data like the following:
[
    StatusCountByDay(status: .sent, day: .sun, count: 2),
    StatusCountByDay(status: .sent, day: .mon, count: 0),
    StatusCountByDay(status: .sent, day: .tue, count: 1),
    StatusCountByDay(status: .sent, day: .wed, count: 5),
    StatusCountByDay(status: .sent, day: .thu, count: 12),
    StatusCountByDay(status: .sent, day: .fri, count: 5),
    StatusCountByDay(status: .sent, day: .sat, count: 1),
    StatusCountByDay(status: .written, day: .sun, count: 3),
    StatusCountByDay(status: .written, day: .mon, count: 2),
    StatusCountByDay(status: .written, day: .tue, count: 2),
    StatusCountByDay(status: .written, day: .wed, count: 1),
    StatusCountByDay(status: .written, day: .thu, count: 2),
    StatusCountByDay(status: .written, day: .fri, count: 1),
    StatusCountByDay(status: .written, day: .sat, count: 10)
]
All that’s left is to pass that to Swift Charts, for which I’ll break down each section after I show the code:
Chart(results) { data in
    BarMark(
        x: .value("Day", data.day.shortName),
        y: .value("Count", data.count)
    )
    .annotation(position: .top, alignment: .top) {
        if data.count != 0 {
            Text("\(data.count)")
                .font(.footnote)
                .bold()
                .foregroundColor(data.status.color)
                .opacity(0.5)
        }
    }
    .foregroundStyle(by: .value("event", data.status.actionableTextShort))
    .position(by: .value("event", data.status.actionableTextShort))
}
.chartForegroundStyleScale([
    EventType.sent.actionableTextShort: EventType.sent.color,
    EventType.written.actionableTextShort: EventType.written.color,
])
Firstly, we want a bar chart, so the correct type of mark to use is a BarMark. The x axis is the short name of the weekday (“Mon”, “Tue”, etc), and the y axis is the count.
The .annotation section puts the little figures above each bar, and isn’t particularly necessary but I liked the way it looked.
The two BarMark modifiers .foregroundStyle(by:) and .position(by:) both tell Swift Charts how to define and handle each series independently; otherwise, they’d be a single bar, stacked on top of each other within each day. Grouping them by event type, the first modifier tells them to be different colours, and the second puts them as independent bars side by side instead of on top of each other. I use data.status.actionableTextShort as the value to distinguish the data by, because that is what I want shown in the legend beneath the chart (“Sent” vs “Written”, etc).
You can see below the results of the chart without the .position(by:) modifier, and without the .foregroundStyle(by:) modifier, respectively.

Finally, the .chartForegroundStyleScale modifier defines the colours to be used for each series, which is a dictionary mapping the name of the series to its colour. In this case, I use want them using the colour defined for the event type, to keep it consistent with the rest of the app.
I’m quite impressed with Swift Charts and how easy it makes drawing a good looking chart, but there are definitely some things that could be more obvious about it. The lack of decent documentation with plenty of examples and screenshots being a very clear area for improvement!
-
Yes, I realise none of the rest of the app is localised. Baby steps, though! ↩
-
As you may have realised by now, I’m quite a fan of writing extensions to standard types for common functions that could end up being performed regularly. They make the rest of the code a lot cleaner. It’s one of my favourite features of Swift. ↩
Review: LEGO Monster Jam Trucks
20 January 2023 • LEGO ReviewsRecently, two more reviews of mine went up on Brickset: one for 42149 Monster Jam Dragon and the other for its counterpart, 42150 Monster Jam Monster Mutt Dalmation. They’re part of a small series that LEGO has released over the past few years, with two pull-back-and-go Technic monster trucks from the Monster Jam sport. Spoilers for the reviews, but I think they’re great little “intro to Technic” sets, and you can’t go wrong at less than £18.

Review: 40651 Australia Postcard
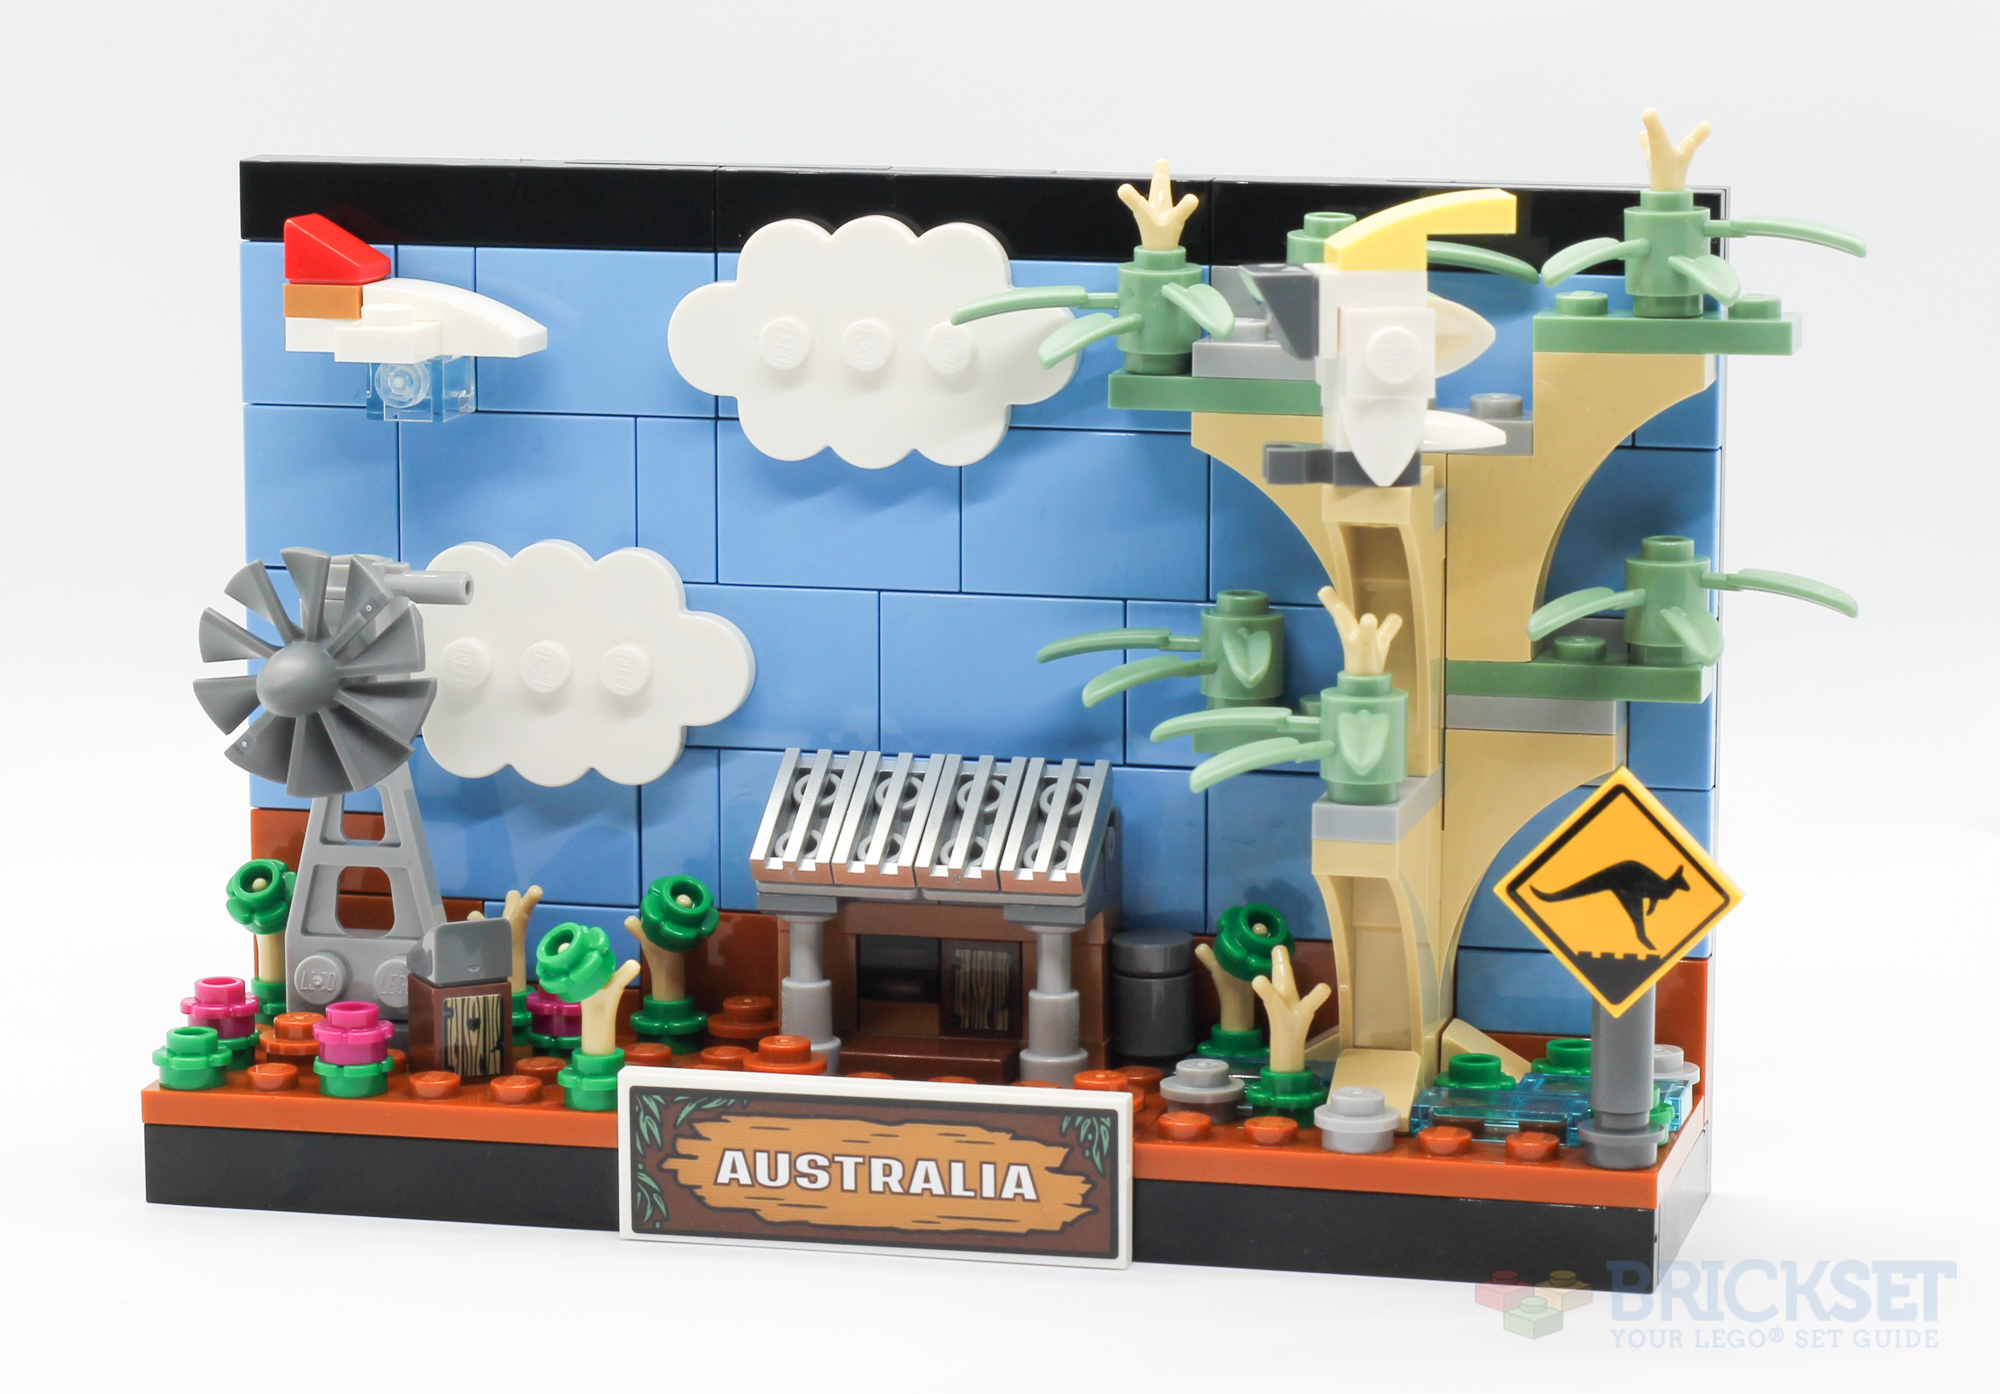
3 January 2023 • LEGO ReviewsI’ve quite liked the previous sets in the LEGO Postcard series, so it was good to get a chance to review the latest, 40651 Australia, even if it’s a slight departure from the rest:
The designers have chosen to represent the entirety of Australia with a small shack, a windpump, an outdoor toilet, a large tree with a cockatoo, and a sign warning of kangaroos. There’s also a Qantas plane flying through the bright blue sky, and small colourful plants growing around the ground.
Brickset LEGO Gift Guide - $50 and up
23 November 2022 • LEGOThe last two holiday gift guides have been published at Brickset, where we’ve chosen a number of sets in a variety of price brackets. Go and check out the sets between $50 to $100, $100 to $200, and $200 and up!
Brickset LEGO Gift Guide
20 November 2022 • LEGOBrickset have started publishing their annual Gift Guide, and this year Huw asked for my thoughts to be included. So far, guides for the first two price ranges have been released, for sets under $25 and sets priced between $25 and $50. Click through to see my recommendations!

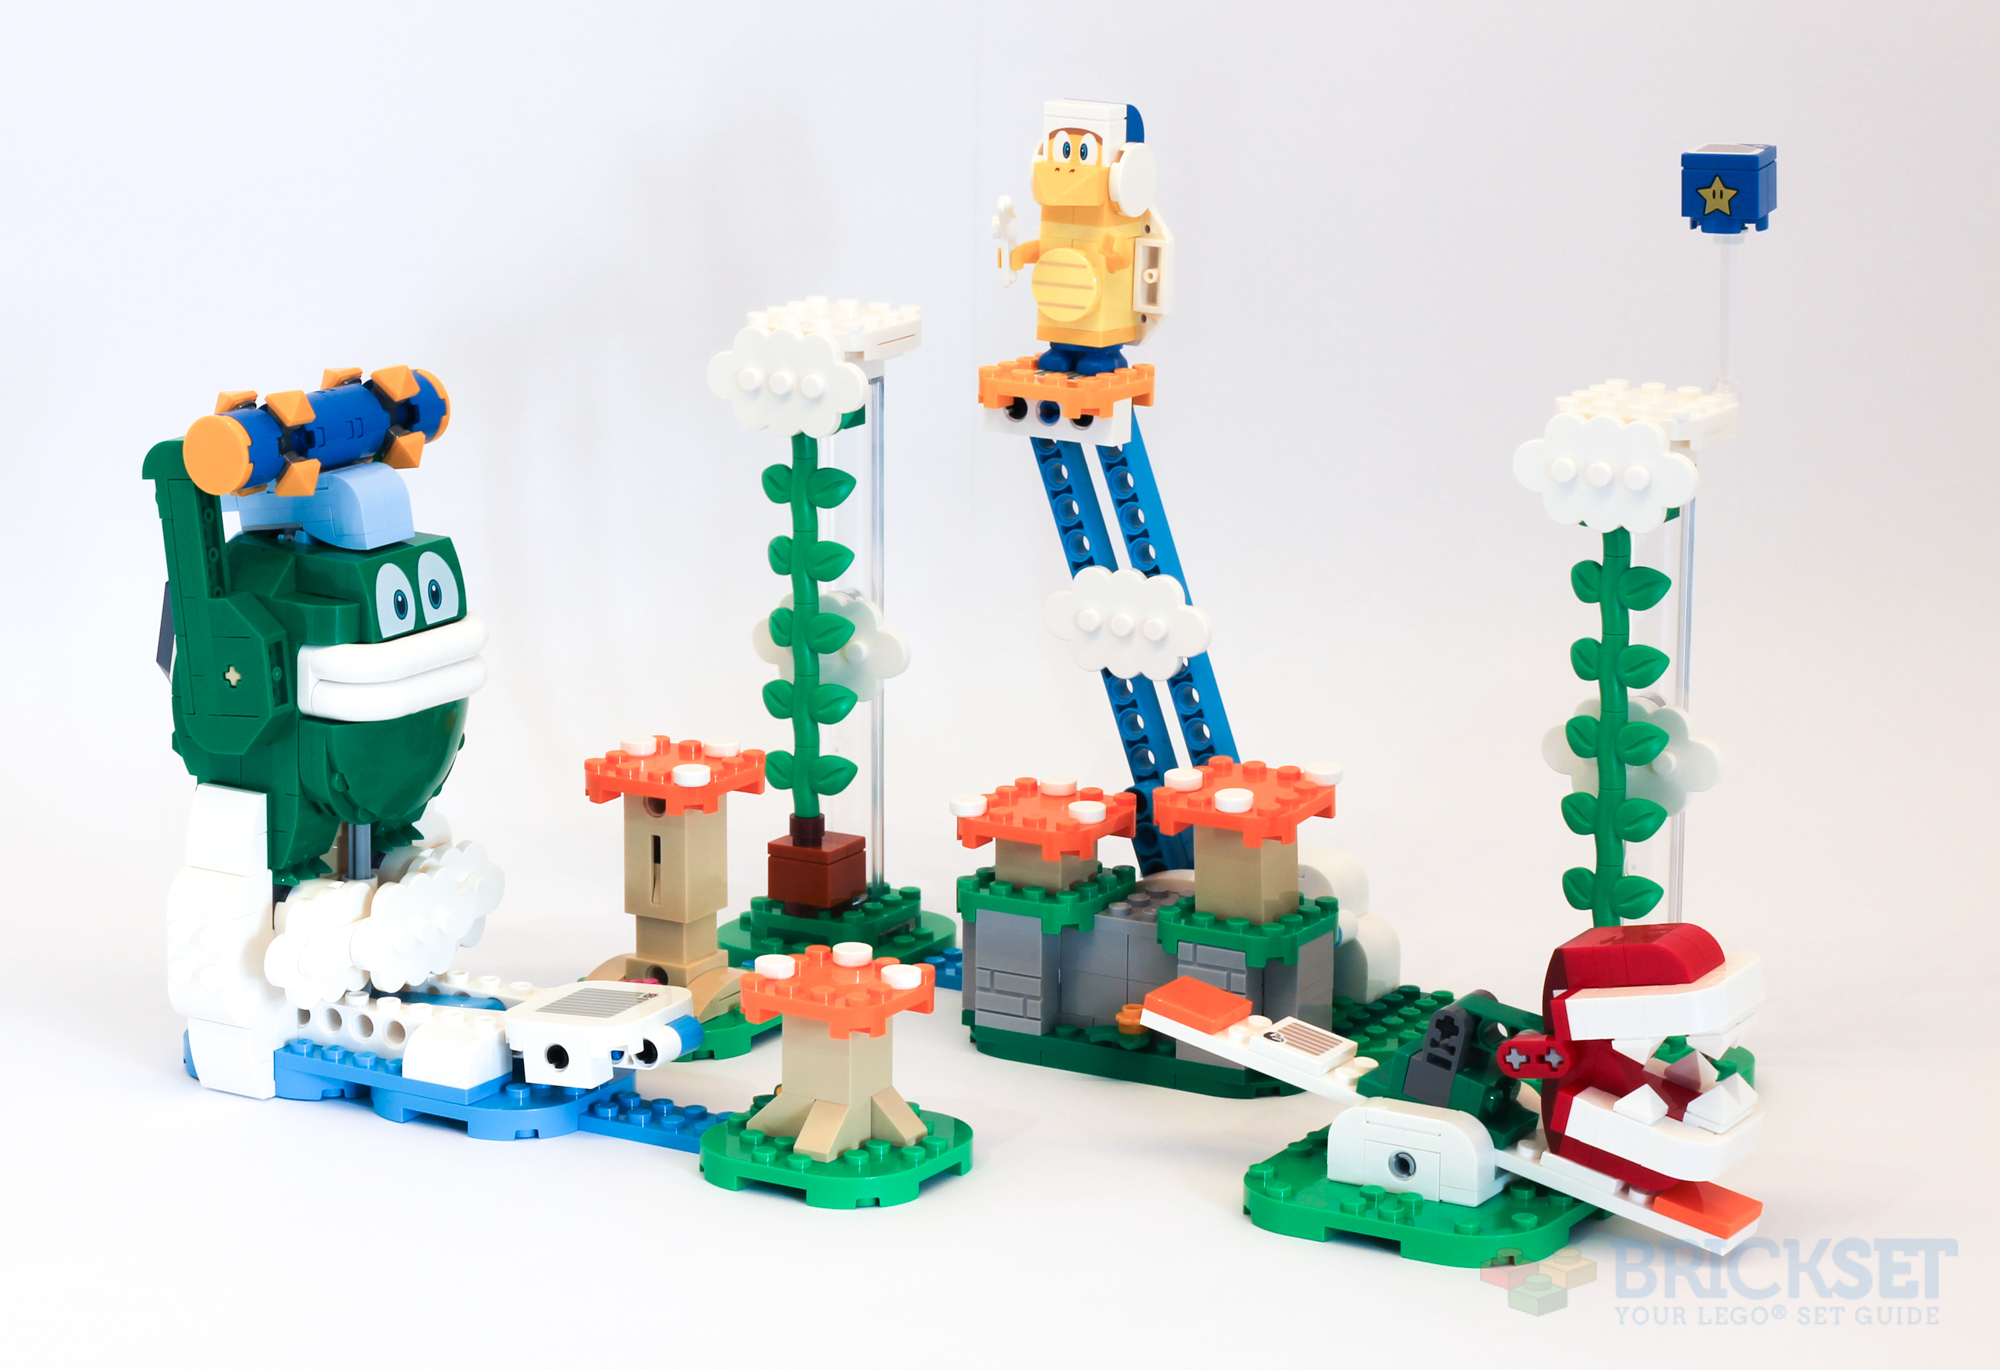
Review: 71409 Big Spike's Cloudtop Challenge
28 October 2022 • LEGO ReviewsThe last of this round of Super Mario LEGO sets to review, 71409 Big Spike’s Cloudtop Challenge:
LEGO keep on producing Super Mario expansion sets to add to what is clearly a popular theme for them—this year they have released 14 distinct sets in the range so far. 71409 Big Spike’s Cloudtop Challenge is one of the largest, with 540 parts, and packs a decent punch: three opponents, two of which are new, and some fun takes on the interactivity and game play we’ve come to expect with these sets.
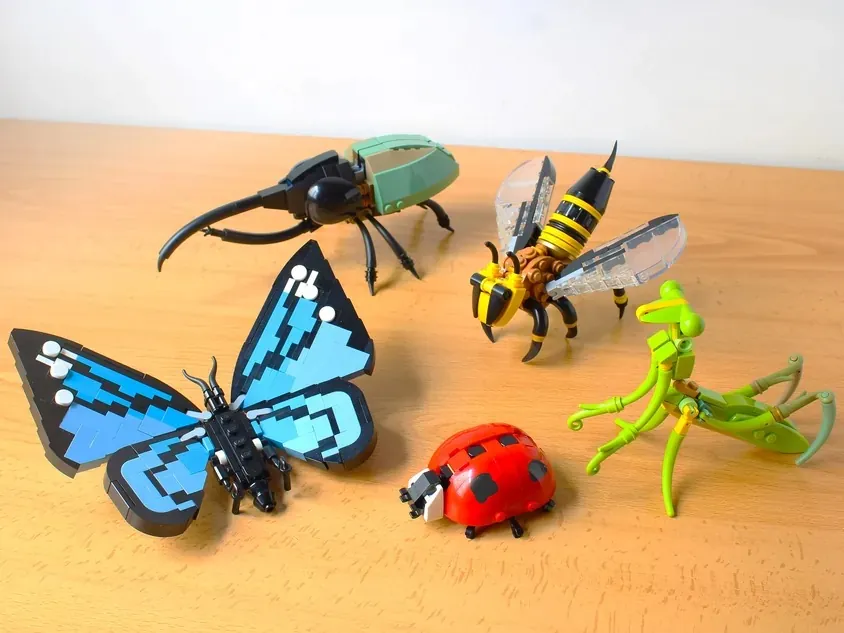
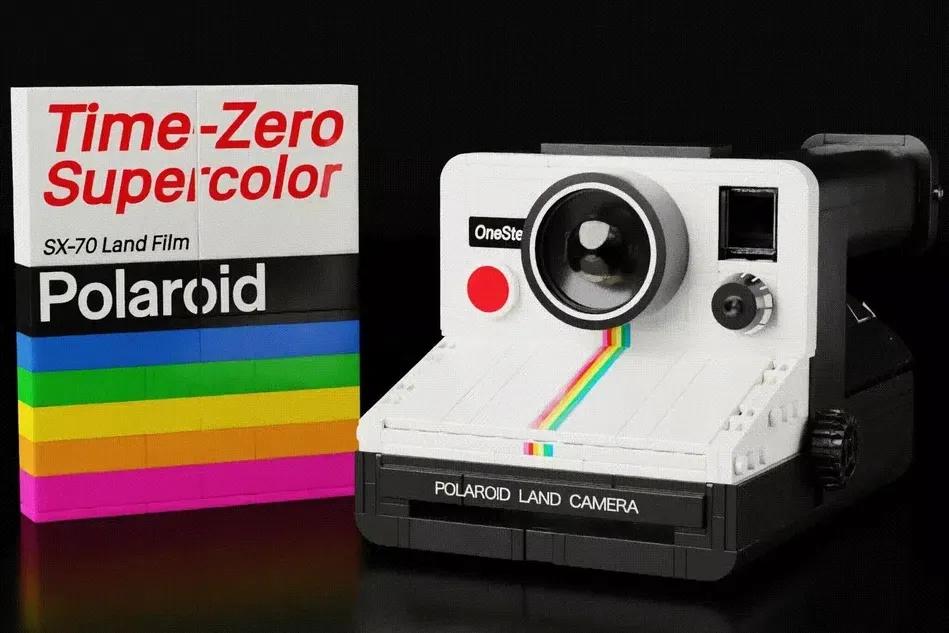
LEGO IDEAS Review Results
27 October 2022 • LEGOLEGO have announced the results of the latest IDEAS review (the mechanism by which fan-designed models can get made into real LEGO sets, should they reach 10,000 votes and pass the review). Four projects were accepted this time, and I particularly like the look of the Space Age designs, which will hopefully be an instant buy when it eventually comes out some time in 2023/2024. The other three ideas also look fantastic, and it will be interesting to see how LEGO adapts them to become production-ready sets. I hope they include Chris McVeigh on the team designing the Polaroid, as that is right up his alley!
Tales of the Space Age by John Carter

LEGO Insects by hachiroku24
Polaroid OneStep SX-70 by Minibrick Productions
The Orient Express, a Legendary Train by LEt.sGO

Darker Sublime Text Plugin
26 October 2022 • Development • PythonBlack is a popular code formatter for Python code, known for its opinionated uncompromising stance. It’s incredibly helpful for teams working on common Python code to write in the same style, and Black makes that easy, without having to maintain a common set of configuration options between the team members. After all, there aren’t any.
However, adding it to an existing codebase is difficult. It wants to reformat every source file, which can be a pain with version history by creating commits that are purely formatting changes, or adding misleading diffs to commits that are intended for something else. To help overcome this, Darker was created, which runs Black but only on the parts of code that have changed since the last commit. This is perfect for running as a post-save hook in your IDE, to consistently keep your code up to style without altering the parts of the source you haven’t changed.
The Darker documentation includes instructions on how to integrate the formatter with PyCharm, IntelliJ IDEA, Visual Studio Code, Vim, and Emacs—but I use Sublime Text. All it took was to write a simple Sublime Plugin, however, and we’re off to the races:
import sublime_plugin
import os
import subprocess


class DarkerOnSave(sublime_plugin.EventListener):
    def on_post_save_async(self, view):
        filename = view.file_name()
        if view.match_selector(0, "source.python"):
            subprocess.call(["darker", filename], cwd=os.path.dirname(filename))
To add this yourself, go to Tools > Developer > New Plugin… from the menubar, and replace the contents of the file with the above. Save the file as something like darker-on-save.py in the same location it was created in (the default in the save dialog box), and now every time you hit Save on a Python file, it’ll ensure that the code you added or altered is up to scratch with your style guide. Simple!
Useful Avrae Aliases
10 October 2022 • D&D • AvraeAvrae is a Discord bot that makes running and playing D&D play-by-post games much easier—it provides useful tools such as integration with D&D Beyond, powerful dice-rolling options, and combat initiative tracking.
However, there are some things it doesn’t do well natively. For this, it provides a powerful scripting API via aliases and snippets for you to extend its functionality with your own commands. Many people have written their own, and these are a few of the custom commands that we have set up in our games to make life just a little bit easier.
To use any of these aliases, paste the text in the code blocks below into a DM with Avrae (or any channel they are a member of).
Quick Character Switcher
When you link a character from D&D Beyond, Avrae will remember it and allow you to use the character in combat and for ability checks, etc. However, if you’re playing in multiple games, you have to constantly remember to change the active character to the correct one before continuing. We found a handy alias on the Avrae Developer’s Discord for assigning characters to channels, so instead of remembering that “in this channel, I’m Kaith, but in this channel, I’m Elmer”, you can just run !ch to switch to the right character for that game. I’m reproducing that here (tweaked for a recent Avrae update that deprecated a couple of the commands):
!alias ch {{c,id,a,m,n,h,H,w,R=load_json(chars) if exists('chars') else {}, {'c':str(ctx.channel.id),'s':str(ctx.guild.id if ctx.guild else "")} ,&ARGS&[1:],&ARGS&[:1] or 0,'\n','- This Channel','- This Server' ,'',"%x"%roll('1d16777216')}}{{m=(1 if m[0] in 'add' else 2 if m[0] in 'delete' else 3 if m[0] in 'roster' else 4 if m[0] in 'help?' else 0) if m else 0}}{{x=not m or ((a[1] if a[1].isdigit() else id.c if a[1] in 'chan' else id.s) if a and len(a)>1 else id.s)}}{{X=not m or ((a[0] if a[0].isdigit() else id.c if a[0] in 'chan' else id.s) if a else id.s)}}{{name=c.get(X)}}{{emb=f' -title "Quick Character Changer" -footer "!ch [help|?] - Bring up the help window" -color {R} '}}{{A=''.join([c[i] for i in c if i==id.c][:1]) or ''.join([c[i] for i in c if i==id.s][:1])}}{{add=not m==1 or not a or c.update({x:a[0]}) or set_uvar('chars',dump_json(c)) or a[0]}}{{delete=not m==2 or not c.pop(X) or not set_uvar('chars', dump_json(c)) or X}}{{"embed "+emb+(f'-t 10 -desc "Added `{add}` to ID `{x}`."' if (m==1 and a) else f'-t 10 -desc "{"No char found for ID" if not name else f"Removed `{name}` with ID"} `{X}`."' if m==2 else f'-t 20 -f "Roster| {n+(n.join([f"`{i}` - `{c[i]} ` {h if i in id.c else H if id.s and i in id.s else w} " for i in c]) or "*None*")}"' if m==3 else f'-f "!ch|Changes to the appropriate character for the channel/server." -f "!ch roster|View a list of all channel/server id\'s and the character they will load" -f "!ch add <name> [chan⏐id]|Adds `name` to the selected id. Default is server id, `chan` selects the channel id, or you can input the channel/server id manually" -f "!ch delete [chan⏐id]|Deletes the given id. Default is server id, `chan` selects the channel id, or you can input the channel/server id manually" -f "Current ID\'s|`Channel` - `{id.c}`{n}`Server` - `{id.s}`"') if m else (f"char {A}" if A else "embed -t 5 -desc 'Channel not found in list'"+emb)}}
With that alias set, you can run !ch add [character] chan to assign the provided character to the current channel. Now, when you switch channels, you just have to run !ch to activate the right one.
However, remembering to run !ch is easier said than done. How many times have I switched to a channel and run !g lr to give my character a long rest, before realising that I hadn’t switched and had just given one of my other characters a poorly-timed rest instead? To solve this, we put together an alias (worked out mostly by my friend Madi) designed to prefix any command you may want to run, that automatically switches before executing the actual command you asked for:
!alias x multiline
<drac2>
id={'c':str(ctx.channel.id),'s':str(ctx.guild.id if ctx.guild else "")}
c = load_json(chars) if exists('chars') else {}
n ='\n'
A= ''.join([c[i] for i in c if i==id.c][:1]) or ''.join([c[i] for i in c if i==id.s][:1])
return f'!char {A}'
</drac2>
!&*&
For me it’s aliased to x, just to make it quick and easy to type. !x check str will always do a strength check for the right character for the game in this channel. !x g lr will always give the correct character a long rest. In combination with the !ch alias, this is probably the most handy alias I have set up—I only have to remember to always use !x instead of !, and it always just does the right thing.
Feat Spells
The other problem we frequently run into is using spells provided by feats. There are many feats that provide the with character additional spells; one’s they’re able to cast a particular number of times between rest, without using up spell slots. A good example is the Magic Initiate feat:
Choose a class: bard, cleric, druid, sorcerer, warlock, or wizard. You learn two cantrips of your choice from that class’s spell list.
- In addition, choose one 1st-level spell from that same list. You learn that spell and can cast it at its lowest level. Once you cast it, you must finish a long rest before you can cast it again using this feat.
Avrae only partially understands these. Pulling from D&D Beyond, it creates a custom counter for each spell you’ve learned, with the correct number of “bubbles” for the amount of times you can use it, such as the example in the screenshot below:
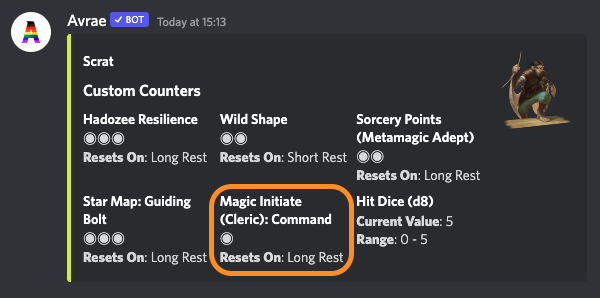
Here, Scrat (my Hadozee character) has the Magic Initiate (Cleric): Command counter, that corresponds to his background feat providing that 1-st level spell. Avrae’s also added the spell to Scrat’s spellbook (!sb), meaning Scrat is able to cast it. However, they’re not linked together in any way. Casting the spell uses a spell slot (it shouldn’t) and doesn’t update the counter (it should). This means that instead, there are a number of things I need to remember to do when casting the spell:
- Firstly, check the custom counter to see if it’s been used or not (i.e. is the spell available to me, or do I need a long rest first).
- Cast the spell without using a spell slot (the
-iflag to!castor!i castwill do this). - Decrement the counter.
To solve this, I wrote a short alias I call !featcast, which can be used in place of !cast (or !i cast) to handle the above three things:
!alias featcast {{a=&ARGS&}}{{H=not a or "help" in a or "?" in a}}{{s,r=H or a[0],H or " ".join(a[1:])}}multiline
<drac2>
if not H:
    ch=character()
    s=s.lower()
    ccs=[x for x in ch.consumables if ":" in x.name and (x.name.split(":")[1].lower().endswith(s.lower()) or x.name.split(": ")[1].lower().startswith(s.lower()))]
    cc=ccs[0] if ccs else None
    if cc:
        t,n=[x.strip() for x in cc.name.split(":")]
        if cc.value > 0:
            i=""
            if combat():
                i="i "
            cc.set(cc.value-1)
            return f"!{i}cast '{n}' -i {r}"
        else:
            return f"!embed -title 'Cannot cast {n}!' -desc '{ch.name} does not have any uses of {n} from the {t} feat available.\n\n**{cc.name}**\n{cc}'"
    else:
        return f"!embed -title 'Could not find a \"{s}\" custom counter' -desc 'Check that your feats for **{ch.name}** are set up correctly.' -thumb <image>"
else:
    return f"!embed -title 'Help for feat-casting' -desc 'Use `!featcast <spell>` to cast a spell provided by a feat, instead of using your spell slots.'"
</drac2>
It relies on the fact that Avrae names the custom counters sensibly, in the format of “Feat Name: Spell Name”. When typing !featcast command -t Target1 -t Target2, it will look for a custom counter named in that way that could possibly match the provided spell name. When it finds one, it checks for a free slot, and casts the spell (with the provided arguments), decrementing the counter.
There are many feats and backgrounds that provide spells, and this alias has made handling them much easier. Hopefully it can be of some use in your games too!